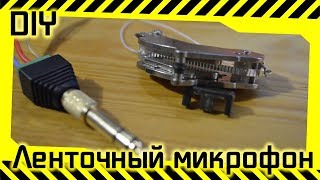
This is how to make a Ribbon microphone. If you've ever wondered how to make your own DIY mic, here's one way. It's inspired by the RCA Bk-5B.
By request, some affiliate links to some items to make your own ribbon mic:
🧲Magnets: https://amzn.to/3UMJmEx Be careful, they are fragile!
🔩Neutrik Male Connector: https://amzn.to/2DUpnBr
🪒Ribbon foil: https://amzn.to/2LCErHP Select the thickest, heaviest sheets from the pad for ribbon use
🔧Tools: https://amzn.to/3RTsCMw Xacto https://amzn.to/2PBobZi
🎄Wood Veneer, Single Ply: https://amzn.to/3RBWhse Took about 3 5x8 sheets of walnut
🖨Cricut Maker: https://amzn.to/4atwjQr
Ribbon mic and mixer:
🎙 https://amzn.to/41xQKre
🎛 https://amzn.to/31mii4H 👈This is the one I used to narrate the video.
(👆I make a small commission when you purchase)
#maker #diy #microphone
I'm back with a new Ribbon design, which is my own design, based loosely(visually) on the RCA BK-5. There are many differences between the two, the biggest perhaps being that mine has a figure-of-8 pickup pattern(picks up equally from both sides of the ribbon element), where the BK-5 has a hyper-cardioid pattern(focused bubbled directly in front of the mic). They also share ribbons of a similar length, though mine is a bit wider, I believe.
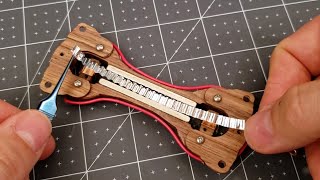
In similar fashion to my last microphone, this one is made from single ply walnut veneer cut on a Cricut cnc plotter. After weeding(not shown), the parts are tacked together with CA, and then the magnets are glued in. Gluing the magnets is a one shot deal- if you don't get them in just right on the first attempt, you'll be tearing apart your hard work to reclaim the magnets...ask how I know!
Next, the chassis is basically soaked in CA to allow it to penetrate to the center of the chassis. Some sanding helps the chassis it's final shape, then a coat of CA seals it once more. Or twice if you want a shiny finish!
The ribbon mounting plates are pretty important to the design. They must be highly conductive and stiff enough to withstand the pressure of the top plate squeezing down tightly. They also take a lot of abuse from soldering and de-soldering.
Mounting the ribbon is finicky business, even on such a short model. I showed it in (mostly) real time, speeding up the video only to tighten screws as needed. Unlike RCA 44 clone I made, I decided not to use a signal generator to tighten the ribbon and set a cutoff frequency. In this video, I wanted to show an easier method for ribbon tightening- basically eyeballing the tension, and listening back. If the ribbon looks floppy or crinkly, then it's too loose. If it looks tightly stretched, then it probably is too tight- which leads to a metallic resonance on playback as you would expect from a piece of aluminum. Listening to the finished motor through headphones, does it sound floppy, or crinkly? Then it's likely too loose. With practice, you get a good intuition about what's visually out of whack, or pretty close to spec.
After wiring it up, I put a small framed cotton gauze(a throwback to the old RCA 44) which helps tame bass and "plosives." The RCA inspired grill also serves a purpose, as it has an acoustic cloth with properties similar to the gauze(a second guard against plosives).
A big Thanks goes out to Tamas at Savaria Studios, in Brookyn, NY where we recorded a stereo pair of these mics in a Blumlein arrangement. Tamas, the studio owner performed the drum beats. Halfway through through the sample, I thought it would be interesting for viewers to hear what the addition of the Wood 44 clone sounded like in front of the kick drum. Notice the difference in low end!
#microphone #woodworking


Информация по комментариям в разработке