How I went about building an OVERSIZED bookcase with arched features.
For more behind-the-scenes content and to support the channel: / hwdesigns
To support "the show:"
- Like
- Subscribe
- "Ring the Bell"
- Follow me: / honestworkdesigns
DIMENSIONS:
Base Cabinet:
3 - Side panels, 14 ¼” x 28 ½” x ¾”
2 - Bottom panels, 14 ¼” x 3’ 3 ½” x ¾”
4 - Top Stretchers, 4” x 3’ 3” x ¾”
Base Cabinet Doors:
8 - Rails, 2 ¼” x 14” x ⅝” (includes ¼” tongues)
8 - Stiles, 2 ¼” x 24” x ⅝”
Shelves:
3 - Side panels, 5’ 2 ½” x 12” x ¾”
4 - Top/Bottom Panels, 3’ x 10 ¾” x ¾”
2 - Arch Features, ~24” circumference
Face Framing
¾” thickness
CHAPTERS:
0:30 - Base Cabinet
5:15 - Table Top
6:57 - Shaker Doors
9:08 - Shelf Case
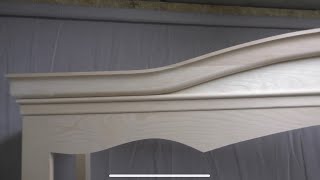
11:10 - Arches
14:22 - Shelf inserts
14:53 - Finishing
15:52 - Crown Molding
17:14 - Installations
Music Credits:
Spinning the Wheels
Dusty Decks
https://player.epidemicsound.com/
When the Noise Settles
Dusty Decks
https://player.epidemicsound.com/
Poetic Wax
Dusty Decks
https://player.epidemicsound.com/
Disque Magique
Dusty Decks
https://player.epidemicsound.com/
Picture Sleeves
Dusty Decks
https://player.epidemicsound.com/
Crackle & Chop
Dusty Decks
https://player.epidemicsound.com/
Stone Cookies
Dusty Decks
https://player.epidemicsound.com/
Golden Crates
Dusty Decks
https://player.epidemicsound.com/
* TRANSCRIPT OF VOICEOVER*
How to make, or how I made - an oversized bookshelf with arch elements.
Let’s get into it.
This is a commissioned piece, so after nailing down the design, materials, and finish with the client - I cracked on with my first cuts into 4/4 furniture grade pine.
I started by cutting the rough lengths for the 5 panels and 8 stretchers that would make up the framework of the base cabinetry. The dimensions for which I’ll put in the description below.
Then, with the jointer, planer and table saw, squared each piece of rough sawn
To get the panels the right width, I laminated a couple of the square pieces together.
Then cut them down to their exact sizes.
After a quick sand down, and another trim to account for the addition of the face framing, I added ¼” rabbits on the back length of each piece that would later become a side panel of the cabinet
These would accommodate the cabinet backing.
Then, I cut ¾” dados to roughly 4” above the bottom of each side panel to accommodate the bottom panels.
To start piecing the puzzle together, added a little wood glue to the dados and used square clamps to align the first box.
With those set, I added a few pocket holes to the stretchers that would anchor the upper part of the base cabinets.
Then facened them into place.
I worked through the same process for the second box.
Then, pleased with the alignment, turned the whole thing over to anchor the kick plate stretchers into place adding the needed rigidity and strength.
Not pictured were a few additional pocket holes on each of the undersides of the bottom panels for added anchoring.
Nwo I hate to do it, but I’m going to break the fourth wall and level with you that the footage I got to explain how I did the face framing for this base cabinet was terrible, so while sand that face framing down, let me use the way I framed the upper shelves to explain.
I started by laying out the actual cut pieces on the project determine the cut lengths for each piece.
Then cut them down to size, and used pocket holes on the back side to connect all the frame pieces together.
With the frame together, I flipped it over to hide the pocket holes, and used a finishing gun to place the frame. Then puttied them to hide the nail holes
Alright, back to sanding.
With the finishing level sandown complete, I cut, sanded and placed the ¼” backer pieces.
Using a nail gun, I secured them to the base cabinet.
With the base cabinet structurally looking good, I turned to the base table top.
I started by cutting some 10/4 pieces of pine down to a rough length.
Then, after ripping them to fit on jointer, squared each piece.
And laminated them back together.
I decided to laminate the full counter in two sets so I could really pay attention to each long grain joint as they cured and help avoid bowing/cupping.
Once dried, I trimmed the edges square, and ripped the length down to the exact 16” dimension.
After that it was time for another finishing level sand down, and jump to another element of the bookcase - the shaker style doors for the base cabinet.
Again, I started with another round of jointing and planing to square the pieces to make up the 8 stiles and 8 rails of the doors.
After ripping the squared lumber down to 2 and a ¼” pieces, I used a tongue and groove bit to cut the 1/4” deep recesses in the stiles and rails, remembering to account for this ½” in the final lengths of my rails.
cont'd


Информация по комментариям в разработке