Click for more info and reviews of this Tekonsha Custom Fit Vehicle Wiring:
https://www.etrailer.com/Custom-Fit-V...
https://www.etrailer.com
Don’t forget to subscribe!
/ etrailertv
Full transcript: https://www.etrailer.com/tv-install-t...
Today, on our 2016 Toyota RAV4 EV, we're going to take a look at, and also show you how to install, the Tow Ready T-One Vehicle Wiring Harness with the 4-Pole Flat Trailer Connector. Part number is 118578. Everything's back in, buttoned up, so now, basically, we're installed. Whenever we want to use our wiring, we're just going to open up our cover, pull it out just like this, and we like to let it sit right over the weather stripping here. You can see it's nice and kind of squishy there, so it's going to give it some protection area. You'll be able to close your door.
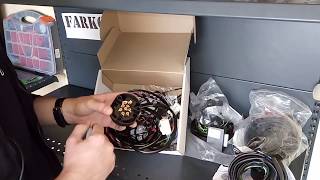
Cool thing about this style setup, where it goes in the door jamb there, is that you pull out just what you need, the rest of it's going to stay stored inside the vehicle. Here's what our kit's going to look like when we pull it out of the package. You can see, here's what we're after, that 4-pole trailer connector, it's got a nice dust cover. This gives us our turn signal, our running light, and brake signal, back to maybe a cargo carrier, or a trailer, or something like that. Part of the system's going to be the module box itself. What this is going to do is, it's going to take the signal from the driver side, also from the passenger side, and convert it into a usable signal that our trailer will recognize.
This converter is completely powered on its own, so it's not drawing any power from the system, other than just to pick up the signal. You'll see here, we're going to have a ground wire. You can use a self-tapping screw, or an existing bolt inside of the vehicle here to get that secured. Now, we're going to have some hardware, some zip ties. I usually use a couple extra zip ties than what the kit has, but this is going to give us everything that we'll need to get a 4-pole trailer connector here at the rear of the vehicle and take care of those needs. To start off, we need to clear out the rear area here, we're going to take the cover off the spare tire well.
Just going to pull up, we can take this trapdoor off. Our battery's going to be located right underneath here, in the EV model. Standard models, it may be under the hood. Got a couple Christmas-tree-type fasteners up here in the front, and we'll pop those out. Then you see, like the little handle here, it popped up on that.
That kind of opens up that battery area for us. Now, this rear threshold across here, we're going to lift up on that, also. We'll pop that out all the way across, you can just see kind of the push fasteners that help hold it in. Now, we're going to grab our 10mm socket, and we're going to remove the cargo tie down here. Now, if we work out from the bottom, we just kind of want to pull back this direction. We'll start separating the clips up around this side. Also, pull up on the jack compartment here, that should give us a little bit more room to pull this panel out. We've got a little Phillips screw right up here at the top. We want to pull out the lower panel here, also this upper panel, and right in here behind the corner is going to be the connector that we'll need to put our T-connector in line with. We're going to want the yellow wire to go up into position there. I like to run it underneath the panel here, kind of to start. Poke it through, then we'll grab it on the back side, pull it right up here where we need it. Now it's time to separate that connector. There's a little tab right on the top, we're going to push in on that tab, and then pull down on our wire. This side plugs in just like that, and this side will plug right into the top where we just disconnected it. All right. That connected, let's line up our little push tabs here, just kind of get everybody popped back where they go. Put our little Phillips screw in up top here, and then also, we can replace our cargo tie down. Now, red and green wire, we're going to be doing the exact same thing that we just did with our yellow wire, but we're going to do that on the passenger side. Now, from our module box, we've got 2 connections to make to our, either a power source, or in this case, we're going to go right to our battery, it's right here, easy to get to. See our ring terminal That's going to go right on the ground stud here for the battery. To remove that nut, we'll need a 10mm. Once that's off, there's going to be a little, like, a square washer behind it. I want to take that off, so I can place my ring terminal down on, put that square washer back on, and then we can just thread the nut back in. Now we're ready to grab our length of bulk wire. We're not going to need nearly as much as what's provided, but it's good. We've got a little too much


Информация по комментариям в разработке