Click for more info and reviews of this CURT Custom Fit Vehicle Wiring:
https://www.etrailer.com/Custom-Fit-V...
https://www.etrailer.com
Don’t forget to subscribe!
/ etrailertv
Full transcript: https://www.etrailer.com/tv-install-c...
Hey, everybody. Ryan here at etrailer. Today, we're gonna be taking a look at and showing you how to install the Curt T-connector vehicle wiring harness on our 2014 Land Rover Range Rover Sport. So, it seems like a lot of people who own these SUVs use them to do a little bit of everything, which does include towing. And it makes sense. They're very capable.
But whenever you tow a trailer, one thing you're gonna need is for the lights to work. That way, you're not only going to be safe, but legal as well. And that's exactly what the wiring kit is going to allow us to do. So it's gonna have a four-way flat connector. Super common.
And works with a lot of different trailers. And one thing nice about the connector as well, a lot of light up accessories are becoming more and more popular. Particularly, cargo carriers. And many of those have that same type of connectors. So, if you have one of those, or maybe planning on getting one in the future, this will power those up as well.
Now, if you're someone that has maybe a larger trailer that has the seven-way round type electrical connector, good news is there's one of those kits available as well. If that's what you're trying to use it of. Now, as far as mounting your wiring, I can think of a few different ways you could do it. It's really just gonna be up to you. You could do it like we have it here today, and just kind of wrapped around our safety chain openings.
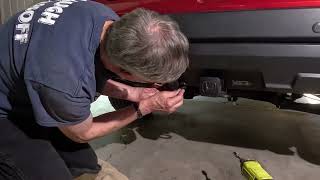
Or what you could do is pick up a handful of different brackets and fasten it to the hitch. And run it out here. And mount it up that way. Or if you don't use your wiring a lot, what you could do is remove this panel. There's this two quarter turn fasteners here that you could just pop off. And it pulls right down. And you could just stash wiring back there, or whenever you're not using it. So, definitely have a few different options. Again, entirely up to you. And as far as the installation goes, you would think Land Rover, wiring, complicated, right And that's not the case at all. This is actually extremely easy to hook up. Essentially, all you're gonna have to do is remove this panel. Plug right into a factory connector. Take a bolt out. Ground the wiring. And that's all there is to it. So, shouldn't give you any issues at all, and take up a lot of your time. Speaking of which, let's go ahead and do that together now. To begin our installation, we're gonna be here at the back of our Land Rover. And what we need to do is remove this panel here. And it's gonna be held in place by two quarter turn fasteners on each side. So, what you're gonna do is take, you can use a flathead screwdriver. I prefer a piece of plastic like this just cause it doesn't gall up the plastic fastener. Sometimes if they're in there tight, you can kind of strip them out. That make sense I'm gonna take this. Rotate it a quarter turn. Will drop down. Do the same thing for this one as well. Then kind of just grab our panel. Remove it and set it to the side. So with that panel out of the way, that'll expose the connector plug that we're looking for which is this one right here. Now this has inserted in it, what's called the dummy plug. It's more or less just a filler to help keep the terminals protected inside the connector. So, we need to remove that dummy plug. So, you're just gonna push down on that tab there. Pull the plug out, and we will not be reusing this. At this point, we can grab our trailer wiring. And this connector plug is simply just going to plug right into the factory one there. So, really straightforward. And then, we need to ground out this white wire with the ring terminal. What I think I'm gonna do is remove this bolt that passes through this metal bolthead here. And use that for ground. So, I'll take a 10 millimeter socket. Pull it out. You can pass the bolt through there. Then simply just reinstall it. At this point, I went ahead and just routed our wiring. And I simply just kind of pushed it behind the panel there. Drop it down and secured it to our hitch. And that's how it turned out. You can just use the dust cap there to put it around your safety chain loop. And now that the routing is complete, we can simply take our panel, and reinstall it the opposite way that we removed it. So now, it's a good idea to test our wiring to make sure that it's working properly. I definitely recommend using a tester like this one here. That way, it will eliminate any potential faults that may be on your trailer's side. But that being said, we'll try our left turn signal. Our right turn signal. Our brakes. And our running lights. And that'll finish up our look


Информация по комментариям в разработке