Click for more info and reviews of this CURT Trailer Hitch:
https://www.etrailer.com/Trailer-Hitc...
https://www.etrailer.com
Don’t forget to subscribe!
/ etrailertv
Full transcript: https://www.etrailer.com/tv-install-c...
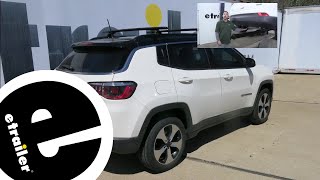
Hey everyone, how's it going Today, we're gonna be going over and showing you how to install the curt trailer hitch receiver, here on a 2015 Nissan Xterra. So this is what our trailer hitch looks like installed on the vehicle here. Now it does sit out from the bumper a little bit, but it has a nice black powder coated finish, which really gives it a great overall appearance, and it's also gonna help protect the hitch from rust and corrosion over time. So adding a trailer hitch to your Xterra, it's gonna be an excellent option because it's gonna make your vehicle that much more versatile. Now we can obviously use a trailer hitch for towing, but let's say we wanted to hit the trails or just simply free up some space inside the vehicle for us and the family on those long road trips, you could easily attach either a hitch mounted bike rack or a hitch mounted cargo carrier. So in regards to towing, our trailer hitch is gonna provide us with a 4,000 pound gross trailer weight rating.
That's the amount we can pull outward. And it also has a 400 pound tongue weight rating which is a downward force on the receiver tube. Now, keep in mind, these capacities are for the hitch only which is tested separately of the vehicle. Therefore we do need to verify the vehicle's towing capacity in the owner's manual and abide by the lower of the two rated components, whether that's the hitch or the vehicle. Also keep in mind, our trailer hitch can be used with a weight distribution system should you have the need to use one, in which case our capacities will increase to 6,000 pounds and 600 pounds respectively.
So the opening size of our receiver tube is an industry standard two inch by two inch, so you're gonna have plenty of those accessories to choose from whether that be a ball mount, a bike rack, or cargo carrier. On the side of the receiver tube, we have our industry standard five eighths inch diameter hitch pin hole. Now keep in mind, our hitch pin clip is not included, but you really shouldn't need to purchase one of these separately because a lot of your aftermarket accessories are actually gonna come with our own, but if you do need one we have plenty of options here at etrailer. And then we have our safety chain loops welded to the bottom of the receiver tube. Those are gonna work great with both the smaller S type as well as the larger clevis style.
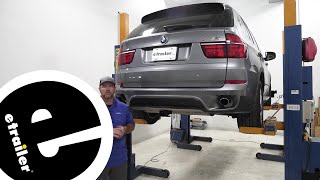
So a couple measurements here for you are gonna help you when you're selecting your hitch mount accessories. The first one is the distance from the ground to the top inside edge of the receiver tube opening. You're looking at about 18 and three quarter inches, so that'll be useful when you're selecting a ball mount, that way you can make sure you get the correct rise and drop to tow your trailer level. And on this vehicle here, the hitch pinhole extends outward from the rear bumper, so you're not gonna have any issues with your folding accessories hitting the vehicle. So, in regards to installation, this hitch is pretty straightforward.
There's no modifying to the vehicle thankfully. Now, ours was kind of rusty under there, so it did make installation a little bit more difficult, but certainly still doable. Your installation difficulty is gonna vary depending on the condition of your vehicle. Now keep in mind, we can certainly do this on the ground. There's plenty of room to work under there, so you don't need to worry about lifting it in the air. And for the most part, it's just common hand tools that we're gonna need. There is one though, you might not have. That's a torque wrench, but you can actually rent this for free from most local auto parts stores. Let's go ahead and jump into that installation now. Give yourselves around one to two hours, depending on your experience. So the first step of our installation today, we're gonna be lowering our spare tire, but don't worry, we will be reinstalling it later after we put the hitch in place. So the tools you need to do this are gonna be located underneath the rear seats in the vehicle, so if you need help with this, make sure to reference your owner's manual, but we'll go ahead and temporarily lower that down now. So the next thing we need to do once we have the spare tire outta the way, we're gonna come over here to the passenger side of the frame, and we're gonna be temporarily removing our exhaust hanger bracket. This is held in place with three bolts: one on this side, two on that side. Now, ours is kind of rusty, so we're gonna go ahead and spray them down with some penetrating oil. Let that sit before we try to get them out. Next, we'll take a 12 millimeter socket and we'll do the bes


Информация по комментариям в разработке