Click for more info and reviews of this Yates Rubber Boat Trailer Parts:
https://www.etrailer.com/Boat-Trailer...
Check out some similar Boat Trailer Parts options:
https://www.etrailer.com/dept-pg-Boat...
https://www.etrailer.com
Don’t forget to subscribe!
/ etrailertv
Full transcript: https://www.etrailer.com/tv-review-ya...
Hi there boat trailer owners. Today, we're going to be taking a look at Yates Replacement Keel Roller. These are available in either a 5/8th inch or half inch inner diameter. You want to make sure you get the appropriate one that matches your keel roller rods diameter. And they're also available in two different types of material, either a heavy duty rubber, which is what you see here, and it's going to be black in color. Or in a TPR, which is a thermal plasticized rubber.
That's going to be an extremely hard durable rubber. The TPR is available in either a cream or blue color. All of these are available in various lengths, so you can get the appropriate one to match your particular trailer.Having a properly functioning keel roller is important for the bottom of your boat when you're pulling it up onto your trailer. You want it to be able to easily glide across the roller and give it a nice surface that it can sit on that's going to absorb any road vibrations and impacts that you're going to hit, like potholes and such out there. This rubber is going to absorb a lot of that, so it's not transferred into the hull of your boat.Our customer decided to go with the heavy duty rubber, but one of the nice things about the TPR over the heavy duty rubber is if there's no chance that it could leave any marks on your trailer.
with this one there is a possibility if it shifts left or right or something, and it slides across the rubber, it might leave a little bit of a black mark. You can wipe it off, but it'll be there. With the TPR you don't have to ever worry about that. You're also going to get a similar shape so you can match it up to your old one. That way it helps center your boat and properly matches the hole underneath to keep it centered on your trailer.
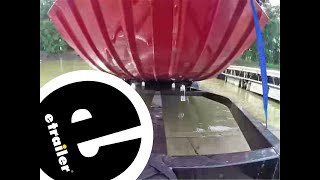
And the rubbers nice and grippy, so once you've got it cinched down, it's really going to hold it nice and tight.If you follow along with us, we're going to go ahead and replace this roller. I highly recommend that you replace your keel roller route at the same time, because once you remove the caps on the end, they're usually damaged and you have to replace the caps. And your rollers often gets damaged from corrosion and rolling around and everything else out there, so we can have an updated to have it nice and smooth like this here.And he can see a keel roller on a small fishing boat here, and you can see that the boat is rested on top of this. And again, that's real important for the hull of your boat. It's going to absorb a lot of that road impact.
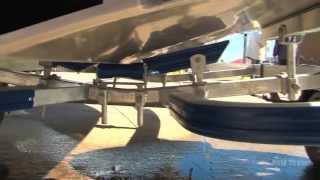
Now this one here is pretty wore out. You can see all the stress cracks in it. So it looks like this one's ready for replacement as well, so we'll be heading here next.Start by removing our rollers nuts. We're just going to get behind it with a pair of pliers. We're just going to pop that cap off there. Our shaft will then slide out. We can remove our roller and then install our new components. And you can see here before we slide our roller on it's constructed of a heavy duty rubber and inserted into each end we have bushings, so that way it can easily glide and roll when it contacts against the metal service here. Because the rubber would want to grab, its got a more grab type property. It's not slick, kind of like the tires on your road. This is a nice slick composite type material that's easily going to let it slide.We've got our shaft here, and I find it easier to get one cap on first, so we're just going to set that on top and we're just going to hammer it into place. I'm going to use a rubber mallet just to help minimize how much dings I make on the little cap. And it's really that simple. And you can see here, there's no way I'm going to push this off. If I wanted to get this off of here, I would almost have to take another hammer and smash it off of there, because if you're just not going to be able to pull it off.Now we can just take our roller, we're going to set it into place. Slide our rod all the way through the roller until it comes out on the other side. We'll then take our cap, we're going to set it into place. Now that we got just barely started we're going to finish tapping it on. I'm going to use a hammer on the other side because it might hurt your hip or something else if you're holding it. And we can see our shaft spins, our roller spins, and it's nice and solid. It's not going anywhere. And that completes our look at Yates Replacement Keel Rollers.


Информация по комментариям в разработке