Click for more info and reviews of this Roadmaster Trailer Leaf Spring Suspension:
https://www.etrailer.com/Trailer-Leaf...
Check out some similar Trailer Leaf Spring Suspension options:
https://www.etrailer.com/dept-pg-Trai...
Search for other popular Grand Design Imagine Travel Trailer parts and accessories:
https://www.etrailer.com/vehicle/2020...
https://www.etrailer.com
Don’t forget to subscribe!
/ etrailertv
Full transcript: https://www.etrailer.com/tv-install-r...
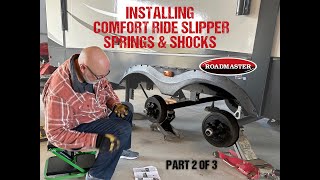
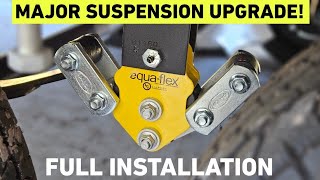
Shane: Hey guys. Shane here with etrailer.com. Today I have a 2020 Grand Design Imagine Travel Trailer and I'm going to be installing Roadmaster's Comfort Ride shock absorbers. These are going to work up to 7000 pound axles that are three inch in diameter.This kit is going to be designed for tandem axle trailers. It's going to come with all the hardware necessary to get them installed. Let's say we're wanting to upgrade our suspension on our trailer because of how rough it rides.
Then you'd just upgrade your equalizer. Lippert Components makes a great one. It is the Road Armor and it's really going to help reduce a lot of the chucking you get where it feels like your trailer is pushing your vehicle.It's going to help reduce a lot of the vibration you get on the inside of your trailer, but it's only going to eliminate or reduce it so much because you're still going to get up and down movement on your axles. Adding the shocks is like shocks on your car. When you go over a bump, it reduces how much up and down movement your axle does or that wheel does.
Being able to do that, again, is going to even reduce more vibration on the inside of your camper.This is what our shock absorbers are going to look like when they're installed on the trailer. Let's say we didn't have these on here. We're just relying on the spring. Keep in mind your spring is all steel, so it's only going to do so much. It's really not going to eliminate a lot of vibrating you get inside the trailer.
Having a loaded shock like this with gas in it, when it compresses or extends, that pressure inside there is going to dampen how much pressure for vibration is caused up inside the trailer.Say we didn't have these on, we don't have cabinets that lock, our drawers slide open because they don't stay closed. When you don't have these, it's going to potentially cause a lot of damage to the inside of your trailer and cost you a lot more money later on. As far as the installation on this, it's pretty simple, straightforward. It's a bolt-on application. There is a plate right here that has to be actually mounted to the frame itself.
Other than that, that is the only modification that has to be done. Again, pretty simple, straightforward installation.There is another type of shock absorber kit by Lippert Components. Instead of mounting on the bottom of the frame, it actually mounts on the outside. I have seen some reviews and complaints that with that mounting on the outside of the frame, it does create a little bit of a clearance issue. With these, we don't have that. It mounts on the inside. The only thing we have to do, depending on your trailer, you may not have to do it on yours, but depending on yours, you can see this pipe here ran across where these had to be installed, so this is a minor adjustment we had to do, put a couple of elbows on and reroute it around our shocks, and we're back to the way we we're from the beginning.Now that we've gone over some of the features, let's walk you through how to get it installed. To start our installation, we need to make sure we don't have any obstructions in the way. If you notice, this pipe here was running right across, straight across to you. It was actually going to get in the way of the shock because the shock's going to go like this right up to our frame rail from the inside of our spring.So what I did is I cut it off and I'm going to reroute it around the shock after I get the two shocks installed. To start the installation on our shocks, we're going to remove the four nuts on our U-bolts. You want to make sure your trailer is sitting down on the ground, the weight on the trailer is on the axles.Now before we start removing everything, you want to make sure your wheels are chocked. Take a three-quarter inch socket and wrench, you're probably going to need to use a wrench to loosen it first because we don't have a whole lot of distance to get a big impact in here. And then if you have a smaller impact like this or wrench, you can use it to get these nuts off. Remove these four.Pull out the U-bolts. Remove the factory plate. You're going to have a plate for each. Axle end's going to look like this, and notice how it kind of has a


Информация по комментариям в разработке