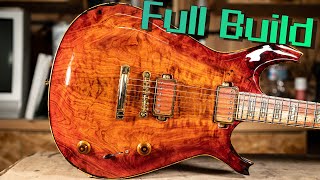
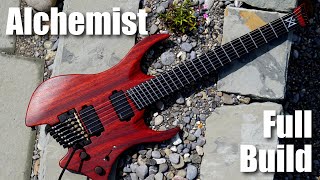
Having moved to a new workshop, I felt the need to celebrate with a new guitar build. As luck would have it the @CrimsonCustomGuitars Great Guitar Build Off 2022 was announced the week before I started, so this is my entry.
I've become increasingly interested in guitar ergonomics, so I settled on a headless design, based on the outstanding work by Ola from @StrandbergguitarsOfficial.
The top is a stunning piece of ash from a local speciality luthiers lumber supplier. The body is a step from a reclaimed mahogany staircase.
As always, I start with the neck. First cutting and planing the neck blank, before cutting the truss-rod cavity. I used chisels and a router plane to cut the groove.
Next I trimmed the neck closer to final thickness using my frame saw with a Turbo-Cut blade. I planed the Indian ebony fretboard down to thickness, then created the 20" radius using my vintage Stanley no. 6 and a radius beam.
I marked the fret slots with a knife before cutting them with assistance from a fretting miter box. In hindsight, cutting freehand would have been easier!
After cutting the neck to the final taper, I added guide pins before trimming the fretboard to fit the taper. Then I used masking tape and a marking gauge to mark a 2mm edge for the binding, which I planed down. The binding was cut from an extra ebony board, then glued to the fretboard and planed to fit.
Next, the body. I trimmed the mahogany down to a workable size before planing the old lacquer off. And then re-sharpening my plane. Next I cut the rough shape, then trimmed the top closer to final size. The top was a nightmare to plane, so I tried removing as much material as possible beforehand.
I cut out the neck pocket in the top, marked the position of the tuners, then cut out the pickup cavities. I then used the top to transfer the cavities to the body, which I then cut out using chisels and a router plane.
Before glueing up, I installed a piece of copper tape between the top and the body. My thinking being that the individual strings can ground into this through their screws. Even though I'm using active electronics, this seems like a good way to future-proof the instrument.
After the glue-up I did the final shaping of the body using mainly my spokeshave, Iwasaki and Shinto rasps. I also added some contours to the top and a comfort carve to the back. I made the cavity cover from a mahogany off-cut. This shaped then planed to thickness.
Once I was happy with the fit between the body and the neck, I glued up the neck, pressed in the frets and trimmed them back to avoid injury. Next I made and glued on some headstock wings, allowing me to hang the guitar on my wall hanger. A veneer from the top wood was added for aesthetics.
My next step was carving the neck. Here I used my previous trapezoidal neck shape. I used gouges, chisels and files to create the headstock and heel transitions.
After drilling the jack, I realised that the rounded internal corner will cause the nut to come loose. To remedy this, I created a spacer that would allow the nut to sit flush against the spacer.
Moving on to fretwork, I aimed at doing rounded fret ends. They're not perfect, but are getting better with every guitar I build. As a final touch I scraped the filing marks off the fretboard using a razor blade.
I went through many different finishes off-camera before landing on a result I was happy with. Thanks to @TornelliGuitars for the melamine lacquer tutorial!
Specs
- Ash top on a reclaimed mahogany body
- Multi-scale 635mm - 650mm (roughly 25" to 25,6")
- Trapezoid-shaped maple neck
- Indian ebony fretboard with 20" radius and jumbo frets
- Machine screw bolt-on neck
- ABM headless tuners
- Fishman Fluence Javier Reyes Pickups
- Free-way 6-position toggle switch
Timestamps
0:00 - Intro
0:13 - Neck blank
1:25 - Truss rod cavity
3:50 - Fretboard radius
6:00 - Fret slots
8:00 - Fretboard binding
12:50 - Body blank
15:18 - Ash top
19:30 - Top cavities
24:10 - Body cavities
29:05 - Trim top and body
31:30 - Body glue-up
32:07 - Shaping the body
35:30 - Cavity cover
37:30 - Neck glue-up
38:30 - Fret installation
39:45 - Headstock wings
42:15 - Neck carve
45:45 - Jack plug and spacer
47:33 - Neck bolts
48:43 - Fretwork
51:00 - Side dots
52:00 - Assembly
53:23 - Reveal and sound demo
If you have any question about the process, the press itself or the materials used, please leave a comment. Also please add any suggestions on improvements or better workflows!
Subscribe for more content!
#greatguitarbuildoff #woodworking #asmr #handtools #ggbo2022


Информация по комментариям в разработке