Click for more info and reviews of this Kodiak Trailer Brakes:
https://www.etrailer.com/Trailer-Brak...
Check out some similar Trailer Brakes options:
https://www.etrailer.com/dept-pg-Trai...
https://www.etrailer.com
Don’t forget to subscribe!
/ etrailertv
Full transcript: https://www.etrailer.com/tv-review-ko...
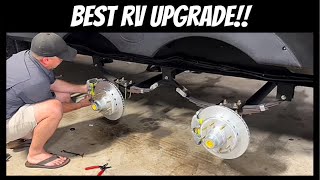
Connor: Hey guys, how's it going Connor here today @etrailer.com. We're going to be taking a look at the Kodiak disc brake kit for 5,200 pound to 6,000 pound axles. So our Kodiak disc brake kit here features a two piece design. Now what's two paced design means is that the rotor is going to be separate from the idler hub. And normally the rotor and idler hub are actually going to be combined in one. I prefer this two piece design here because it's going to make it a lot more cost effective to replace something if it goes wrong.
Therefore, if we have an issue with the idler hub, we can replace just the idler hub and not the rotor or vice versa. This is going to save us time and money. So most trailers from the factory nowadays are going to come equipped with electric drum brakes. It's going to be an excellent option to upgrade to the disc brakes because they're going to provide greater stopping power.They're also going to make maintenance a little bit easier. So most trailers now today are going to come equipped with the electric drum brakes.
As you can see here, we have our disc brake upgrade, which is going to be an excellent option. If you think about automotive vehicles, the drum break technology is a little outdated. Most vehicles now produced are going to come with disc brakes all the way around, but we want our trailer to have that same level of stopping power, responsiveness, and ease of maintenance, which is going to be a couple of reasons why we'd want to upgrade to disc brake on our trailer. So our particular disc brake kit here is going to be for 5,200 pound to 6,000 pounds axles. It's going to give us the six on five and a half inch bolt pattern as well as the 12 inch diameter rotor.However, there are other options for smaller axles, like a 3,500 pound for example.
We would just want to check our axle tag to make sure we have the right capacity and then choose the correct brake kit for that capacity. So as you can see here, we have a nice dacromet finish on our rotor, our display caliper as well as our display caliper mounting bracket. Now this is going to do an excellent job holding up to any dirt debris or rust and corrosion issues we may have with our trailer. inaudible 00:01:59 kit here is going to come with a few components. First, we're going to have the rotor.
We're going to have the caliper with the brake pads already mounted on them. We're going to have our caliper mounting bracket and our caliper mounting bolts. However, if you're switching over to disc brakes here, we're also going to need an idler hub as well as brake lines and an actuator as well.Those can all be purchased here at etrailer. So in regards to installation, this is pretty straightforward. Something that's pretty easy to do by yourself at home with only common tools. Now let's jump right in and show you how to install this yourself. To start installation today, we need to get our trailer in the air. Now we're going to be using our landing gear legs, but if we want, we could also play some Jack stands under the frame to hold it in there so it's properly supported. And once the wheels are off the ground here, we can go ahead and begin to remove the tires using a 19 mm socket. I do recommend removing both wheels on one side. I don't recommend doing all four at once, just so we have that extra security there.So now we need to go ahead and remove the grease cap, which we can do with just a flathead screwdriver. We're just going to get it in here, pry it between the hub then we live on our grease seal. We need to work our way around. Just keep working your way around. You can take it off just like that. So once we have the grease seal off, there's going to be a castle nut behind the screws we have to remove in order to allow us to pull our hub up. So we're just going to take a paper towel here and get rid of some of that extra grease. There's actually going to be a cotter pin here, which we need to remove first. So we're just going to take a set of needle-nose pliers, try and get the cotter pin out of the away.So basically you're going to bend the two tabs back and we're going to try to straighten it out as much as we can. Once we get it straight enough, we should be able to pull it out the other side. Just like that. And then we come back with our channel lock pliers here, try to get a grip on the nut. Shouldn't be on there very tight at all. So it should just be able to thread it off by hand. And behind our castle nut, we should have a washer,


Информация по комментариям в разработке