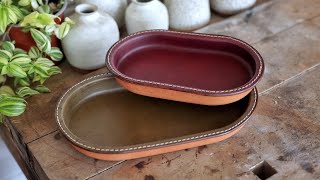
A leather valet tray is the perfect storage solution if you're always misplacing your wallet or keys! With this stylish valet tray decorating your entryway, you can empty your pockets as soon as you walk through the door and know that your must-have items are safely stored and ready to go the next time you need them.
For a full list of supplies used in this video, visit https://www.weaverleathersupply.com/c...
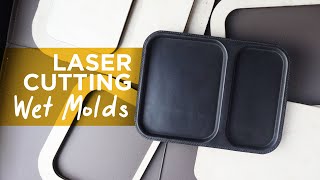
0:09 Let's make a simple wet-formed valet tray! Now for the new folks, this is a simple fun project. It looks good and it makes a great gift. But the bigger point here, we're starting to get a feel for wet forming and there are so many ways we can go with that.
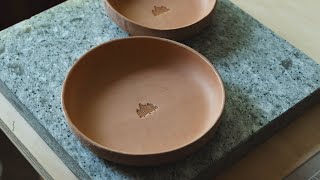
1:25 Now for our molds. All kinds of possibilities in our kitchen, but just a word to the wise, and I'm just speaking from experience, when we borrow something let's make sure we return it. Again, just speaking from experience. Right there, that's a simple ceramic valet. Makes a pretty nice form. Just a piece of cookware. Again, what we're going to go with is just a simple piece of terracotta. There we go. For a couple of reasons. First off, inexpensive and we can pretty much find these everywhere. But secondly the right size, about seven inches across. And the third, I don't want too heavy of a bend here because if we form that too tight a heavier leather it's going to start to wrinkle on us but look how clean that is that's what we're looking for.
4:10 We're going to go with our Weaver Select natural veg tan. This is my favorite veg tan leather. Now, for us crafters, we don't have to buy a full side to get a quality piece of leather. We sell 12 inch by 24 inch panels, and just giving that a ballpark view, we can get three valet trays out of one panel.
5:31 We're going to bevel and groove our edges. To me, this is about the best advice I can offer because a groove line’s primary job is to sink a groove in the edge of our leather. Typically, if we're going to sew I use this on every edge. Right, there. All the difference in the world between an unfinished edge our groove and our bevel also, too. From time to time we find a great leather where we can cut through the top grain, bring in a different color that looks good. So anyway, groover. I use this on just about every edge. So right here, let's come in. I set mine about an eighth of an inch and let's just groove all the way around. Good. We've got a nice groove line. Very consistent. Next up, our edger or a bevel, and if you think of bevel glass, that's exactly what we're doing. We're knocking off the hard top edge, top and bottom so therefore, we're gonna slick and round our edge.
7:26 Let's go with some water, now let's dip our project in. We want to get this fully wet. I would say give it just about maybe eight, ten seconds. Let's lay that out. Good. Got plenty of water in that. Let's give that about maybe 10 minutes. Let that water wick thoroughly through.
8:07 Let's jump over to our mold. Let's lay this in as evenly as we can and let's just slowly start to work this in. Good. Well just one pass we've already got a good form going here, so let's just slowly work this down another 30 seconds, give or take. Okay, now let's take our thumbs and let's just go a little bit harder around the base right in that corner. Well that looks good. How clean, consistent and easy.
9:29 The one thing I'm looking for in my die is consistency, so we're gonna dip dye. It's the only way I dye leather and in fact, dyeing leather doesn't have to be messy, expensive or time consuming. Now we could always go with our dressing sponges. In fact, this is a larger piece. I tend to cut these down to make them go a little bit further. But again, if we're applying this with a sponge it's going to be hard to get that consistent. Same with our daubers. These are great for smaller projects, but it's going to take some time to get dye on this, and again, not going to be consistent.
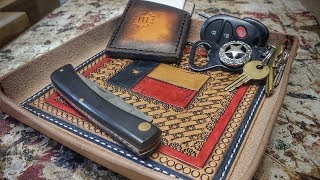
14:20 Now we're going to look at all the possibilities to decorate our valet tray. One of the best parts of leathercraft is we can take the most simple project and blow it up. In fact, this table is not big enough to hold all the possibilities. But let's at least talk about a few, because I hope there's something in here that you love and it takes you in a whole new direction. Or there may be a thread to an idea here that leads you into something absolutely your own.


Информация по комментариям в разработке