Click for more info and reviews of this Dexter Trailer Brakes:
https://www.etrailer.com/Accessories-...
Check out some similar Trailer Brakes options:
https://www.etrailer.com/dept-pg-Acce...
Click for more info and reviews of this Dexter Trailer Brakes:
https://www.etrailer.com/Trailer-Brak...
Check out some similar Trailer Brakes options:
https://www.etrailer.com/dept-pg-Trai...
Click for more info and reviews of this Dexter Trailer Brakes:
https://www.etrailer.com/Accessories-...
Check out some similar Trailer Brakes options:
https://www.etrailer.com/dept-pg-Acce...
https://www.etrailer.com
Don’t forget to subscribe!
/ etrailertv
Full transcript: https://www.etrailer.com/tv-review-de...
Hi there, trailer owners. Today, we're gonna be taking a look at and showing you how to replace the brake assembly on your 10,000-pound axles. We're gonna be using Dexter's assembly to do so. We're gonna be doing the left side here on camera. They are side-specific, but you can get both the left and the right sides available here at etrailer. The other side's gonna be the same thing, just make sure you're putting the appropriate part on the appropriate side.
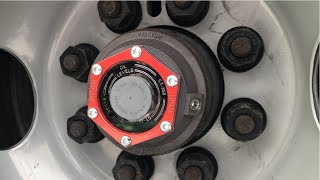
These drum brake assemblies are designed for 10,000-pound axles and drums that are 12 1/4 by four inches. And to further help determine that these are gonna be the correct brakes for you, they are designed for 15-inch and larger wheels. And once you pull your assembly off, you can crawl underneath and take a look at the backside and see how many bolts attach the mounting flange to your brake assembly. So if you're kinda looking around the axle on the backside, how many nuts or bolts you see there. This is designed to work with a seven-bolt flange, so just make sure you see seven, you know, bolts sticking through there on the other side.
And then, this is likely gonna fit yours to match up there. All right, guys. So yeah, we're gonna hop into this thing now. Customer's in here 'cause he has poor operation of his brakes, and with a quick look underneath, we can see grease is all over the place on the inside, so we know that those brakes are no good. So we're gonna get those replaced.
We're gonna be using Dexter's parts to do so, and these are self-adjusting brakes that we're gonna be putting on there. So that way, this customer doesn't need to worry about making adjustments in the future and stuff. It's gonna take care of itself. So we've got our customer's trailer here. We just got the wheels off of it.
So let's get it disassembled. We're gonna remove the outer hub here. So we're gonna start with the cap here on the end. We're just gonna use a pair of channel locks to remove it. And you might wanna use a screwdriver or a pry bar just to hold the hub as you're removing these. And normally, once you get about this far, you start to get a drip or two coming out of it from the oil. But yeah, it's pretty dry in there. So it's definitely gotta leaking seal on it 'cause we don't have any oil inside of it. We didn't really see traces of oil out here, so it's unlikely that this seal here is what's causing the issue. Based on where we see the contamination, it's looking like it's probably that inner seal there on the back. So now that we've got that cap removed, we're going to need to remove the nuts here on the end of the spindle. You'll see it's got these, like a star washer here, but it's got some tabs on it. We need to bend those tabs straight or back. We need to get 'em out the way, so we can get the nut off of there. So we're just using our flat-bladed screwdriver and a little hammer here just to knock those ears up. Check around. You may or may not have another one on there. A lot of times, they put two of the tabs over, make sure it's on a couple of faces. Not always the case, but just kinda look around and check. Looks like we're probably pretty good there. We'll then switch back to our channel locks here, and we'll remove our nut. All right, just set that down. Behind that, we have the locking star washer, and you can see that one was bent over there holding the other nut on the other side. We'll then grab the nut behind it. And behind this nut, you'll have a washer as well. We'll grab that off of there. Yes, we can go ahead and now just slide the hub off. We've got all the nuts removed that's holding on. I'm not gonna slide the hub completely off. I'm just gonna slide it out some, and I got my screwdriver here on the end of the shaft. And this way, we can use that to kinda catch our bearing. Boy, it's a heavy assembly. Oh, there we go. We got our napkins down there. They just fell on there. That's alright. If you have a seal puller, and we do have seal pullers here at etrailer that you can


Информация по комментариям в разработке