Here is the best way to test for hidden moisture.
▶Moisture meter in video: https://amzn.to/2XVvOYQ
▶A more basic moisture meter: https://amzn.to/2JQg2cJ
▶FLIR Camera similar to ours, but with sharper imaging and wider temp ranges: https://amzn.to/2XX6Ihi
▶Another FLIR camera similar to the E8-XT, but lower temp range and includes Wifi:
https://amzn.to/2YaVjJT
(Affiliate links)
----------------------------------------------------
STAIN FU our Paw-some stain & odor remover!: http://bit.ly/stainfu
----------------------------------------------------
http://www.RendallsCleaning.com
Transcript:
Hey there, this is Scott with Rendall's Certified Cleaning Services. We've had a lot of broken pipes because of the cold weather out. What happens is that pipes will actually expand when it freezes and when it thaws, it shrinks back down, ice pushes it out, splits the line, and then when it thaws, it comes back down to regular size leaving a gap there or a cut in the piping itself. So, we've actually been out on several hot water tanks that were broken, baseboard heat recently. So there's just all kinds of broken pipes out there and we'll be glad to help you. I'll show you how we do this really quickly, this is only going to be a very short video.
What we do is come out and address the total situation first because water tends to travel. As a matter of fact, if you look at this wall, it looks dry. A lot of consumers look at a wall and say "Yeah it looks dry to me" but unfortunately, this is able to hide a bunch of moisture as you're going to see in just a second.
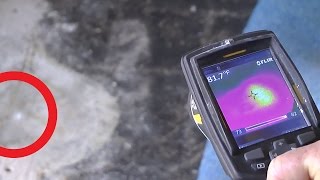
We use this thermal camera. This is called an infrared camera, and what it does is detects heat differentials. If we start up here we can see that..well when I touch it, it leaves red marks because it's warmer. As I move it down towards the baseboard, we can see that it looks a different color there so we suspect there might be some issues right about here, downwards towards the baseboard.
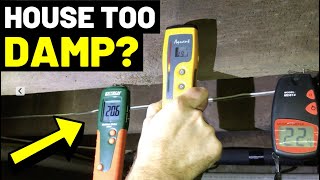
So we've looked at the entire structure let's say that we see this band of purplish-blue area. We're going to confirm that with a whats called a non-destructive moisture sensor. And that's what this device does. We set it to zero. This has a little pickups on the back that will tell us when it shorts out or when it gets to a certain moisture content. It will tell us what that moisture content is. It measures approx a 1/2 inch deep so the sensors will actually penetrate the material non-destructively. There's no pins so we won't leave holes in your drywall. And we start on areas that we suspect are dry first and we confirm that we are looking at 5.3, 5.5 moisture content up here in an area that didn't show that it possibly was wet with the FLIR device. As we move it down, we can start seeing it rise. And right now the light on it comes and goes right now it's at 17, 20, 21, 22, 23. So this whole area seems to be wet from water. Because this is just a mock up wall, we are able to flip it around and take a look at the backside. And we can see that sure enough this whole area is wet, just like the FLIR camera showed us, and just like our sensor showed us.
As water dries, it tries to find equilibrium. So it's going to go from wet to dry. It's going to creep up; we call that "wicking". Even if it's wet, just a little bit on the drywall, it'll start to find it's way up. And it's not uncommon to find drywall wet a foot, several feet, up from where the source happened, depending on the amount of moisture. So our first test is to inspect it and find out what's wet. And then after we've completely drawn a map of the wet areas, then we address the areas that need to be dried. Obviously on this one, this part of the drywall needs to be dry. And if there was insulation back here this one doesn't but if there was insulation we'd have to address the wet insulation as well and also the baseboard.
Typically what we'd do in this situation is pull the baseboard off, we drill inspection holes underneath the baseboard line and see what kind of insulation, if there is any, and dry it from there. If it does have insulation, might have to get a little bit more aggressive. If it doesn't have insulation, we can just literally cut holes there and use dehumidification with professional large dryers and air movement to dry this drywall very quickly without having to tear the whole wall down, or even part of the wall.
So, that's really all there is to it. You know you really should though, if you suspect that you've had an issue with water damage, usually it starts if you don't see it, it'll start smelling within a few days. So you'll have kind of a dirty sock odor. And you can't touch stuff, feels dry, and you're looking at it and you don't know what's going on. The carpet feels dry. Well, it's probably because you have pocketed moisture. So give us a call. The inspection is very inexpensive. We'll come out and take a look at it and address what we need to do, but just know that we're here for you!


Информация по комментариям в разработке