Click for more info and reviews of this Thule Roof Rack:
https://www.etrailer.com/Roof-Rack/Th...
https://www.etrailer.com
Don’t forget to subscribe!
/ etrailertv
Full transcript: https://www.etrailer.com/tv-install-t...
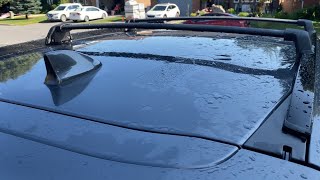
Today on our 2019 Honda CR-V, we're going to be doing a test fit on the Thule Wingbar Evo clamp-on roof rack system. This Thule roof rack system is going to allow you to carry roof-mounted accessories on your Honda CR-V, things like bike racks, kayak carriers, roof boxes, and more.The crossbars are 53 inches long and you can see how they span across the roof of our CR-V. We're going to be able to carry multiple accessories with this roof rack system. We've got the black installed, but they're also available in silver if that's something you're interested in. You can check it out on our website.They have an aerodynamic shape. These are going to be a lot quieter than your round or square bars.
It's specifically designed to fit the naked roof of your CR-V. It's a fix-mounted system. It measures 27.5 inches center on center. This is going to work with most accessories. They have an aerodynamic shape.
These are going to be a lot quieter than your traditional round or square bars, but they're going to work with your clamp-on accessories as well as your T-slot accessories. Now, what's nice about this rubber strip here, we don't need to remove it or trim it around our accessories. That T-bolt just slides to our desired position and then it gives us a nice clean look.The crossbars are held in place by 4 Evo feet. You can see here the thick rubber padding is going to prevent any harm done to our CR-V's roof, and underneath our door here in the front, accesses our hardware. By having the cover it's going to prevent the elements from coming in contact with it and it's going to help deter theft.
Now, if you'd like, you can add some metal locking cores to add more security.The four clamps are what hold our feet to the roof of our CR-V. You can see here how they've got a nice clean fit. They fit on the inside of the door, that way when it's closed we don't have any rubbing. It just fits right around that seal and with everything in place, we can give it a good shake. We can rest assured our roof rack is going to remain in place as well as our accessories.
This roof rack system has a weight capacity of 220 pounds. You do, however, want to check with your CR-V's owner's manual to see if your roof can support that much weight.Now I'm going to give you some clearance measurements. This is going to tell you how much you've added to the roof of your CR-V and it may help you when putting on your accessories. From the top of the roof to the underside of the bar is about 2 and 3/4 of an inch. From the top of the roof to the top of the bar is about 4 inches. Even though this roof rack system is over a portion of your sunroof, you're still going to have full use of your sunroof.Now that we've gone over the features, I'll go ahead and show you how to get it installed. I've already got my front crossbar in place on my CR-V. Once you've got it assembled, per your instructions, you measure up 11 and 3/8 of an inch from the corner of the windshield to the first portion of the pad here, on each side, and that gives you your placement for the front crossbar.The rear one installs very similar. Let's go ahead and do it together. I've got one side assembled. We just need to repeat the same process on the other side. We'll start off by grabbing the Evo clamp foot and remove the front door here. It just snaps off. You can see all the insides here.Let's go ahead and install our clamp. It just slides in the bottom here. Now, an important thing about the clamps is that they're all numbered right here. Per the instructions, for the passenger rear, we need to have number 155. So again, refer to your instructions to make sure you have the correct numbers and install them on the correct side. The clamp just slides up and clips in place. Just give it a good pull and make sure you've got it in there all the way.Here on the bottom, we can install our pad. The pads are also numbered. For this foot, we need number 213. They're very easy to install. Just push them in place and afterwards, give them a good tug. Make sure they're in place. Now we're ready to slide it on to our WingBar.To make it easier, we can turn the WingBar over. We'll need to be sure that the end cap is removed. Then we can take our Evo clamp foot. In order to slide this on, we'll need to take both of our thumbs here, and inside there's a little silver bracket you can see here. Give it a good push and by holding it down, it's going to allow you to slide it into the channel here.Before we slide it on all the way, we'll need to set our scale. Per your instructions, you're going to need to set it at 40.5. That may be difficult for you to see, b


Информация по комментариям в разработке