Click for more info and reviews of this CURT Trailer Hitch:
https://www.etrailer.com/Trailer-Hitc...
https://www.etrailer.com
Don’t forget to subscribe!
/ etrailertv
Full transcript: https://www.etrailer.com/tv-install-t...
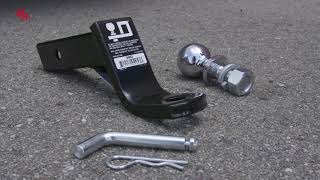
Today on our 2016 Ram ProMaster 2500 we're going to take a look at and also show you how to install the Curt custom fit, class 3 trailer hitch receiver. This offers the 2 inch by 2 inch receiver tube opening. It's part number is C13295. Here's what our hitch is going to look like installed on our ProMaster. As you can see, it gives it a really nice look here at the back. You're not adding a lot.
Our cross tube is going to be hidden up here behind the rear bumper cover and also the bumper beam. Overall, pretty straight forward installation to do. You just need a few simple tools. Do it in the driveway without any kind of an issue. This is a class 3 hitch, so it's got the 2 inch by 2 inch receiver tube opening. It's going to make it extremely versatile.
Really, any type of hitch accessory that's made, it probably comes in a class 3 variety, so it makes it really, really adaptable. You'll see it's got a reinforcement collar around the end. It's nice and flush. Sticks out maybe a quarter inch past the end of the bumper so I don't think you're going to have any issues with bumping into it or anything like that. Safety chain connection points are here, should be plenty of room there to get whatever style of chain connected you might be using.
You'll see our 5/8 diameter pin hole here on the side. This is what we're going to use to secure all of our items with. Now, there's not a lot of room on the back side of it there, so standard pin and clip I think will work fine. A locking hitch pin will probably work okay but if you want to use an anti-rattle device, you're probably going to be better off with like the Immobilizer, that would actually go around the end of it here and pull down on it, rather than the other way. The hitch itself is going to give us a 500 pound tongue weight rating, so that'd be the maximum downward force we could put here at the receiver tube opening. It gives us a 5,000 pound gross trailer weight rating.
It's going to be the total weight of your trailer, then anything that you we're to load up on it. Of course, we want to check the owner's manual on the ProMaster. You want to see what it's tow rating is, then we'll just go off of whichever those numbers are the lowest. Now, a couple measurements that are helpful when it comes to selecting your ball mount, bike rack or hitch cargo carrier. From the ground to the inside top edge of our receiver tube opening, we're going to have about 18 inches. Then, from the center of our hitch pin hole to the outer most edge of our bumper, it's about 2. To begin our installation, we need to get this rear bumper cover removed, so we'll start with our doors open. We want to remove the 4, T-30 hex screws along the back side. If you have back up sensors, we'll come to the underside. There's going to be a plug right here. I'm going to turn it down there so you can see it. There's a little tab right there. We want to lift up on that tab and just wiggle it to separate it, just like that. Then, we've got 4 more screws along the bottom. We'll use our T-30 again for this. You just pull that off and set it aside and we'll put it back on in a few minutes. With the cover out of the way, we're going to take the 2, 15 millimeter nuts off the bottom side. One's kind of in between the tow hook, the other one's a little bit more visible. Now, we'll come to the top side here. We can start removing these bolts. On the side you start here, you'll want to leave one threaded in, just a little bit, til we get the other side done. Then, we'll come over here and remove it. These we're going to use a 16 millimeter. You'll see how that's going to be loose and we'll just support it. Take our bolt out here and we can get it set aside. You'll see here on the back side of the bumper beam, we're going to have 2 holes. These are going to be the holes that our carriage bolts are going to come through. We're going to get those in position by going through these larger holes. Take your fish wire and place it up in the hole. Place it on one of our square hole spacer blocks and our short carriage bolt, and then pull that down through it. It will end up just like that. Now we can take those bolts, we want to pass them down through the holes that are in our hitch here. Once those are through, we'll take our 1/2 inch flange nut and we'll get that started on our carriage bolt. Just leave those loosely installed for now. Now we'll grab the bumper and the beam, we're going to get this slid back into position here, along with our hitch, and we'll be able to secure both the bumper beam and the hitch to our vehicle using the provided hardware. For the studs on the back side, we ca


Информация по комментариям в разработке